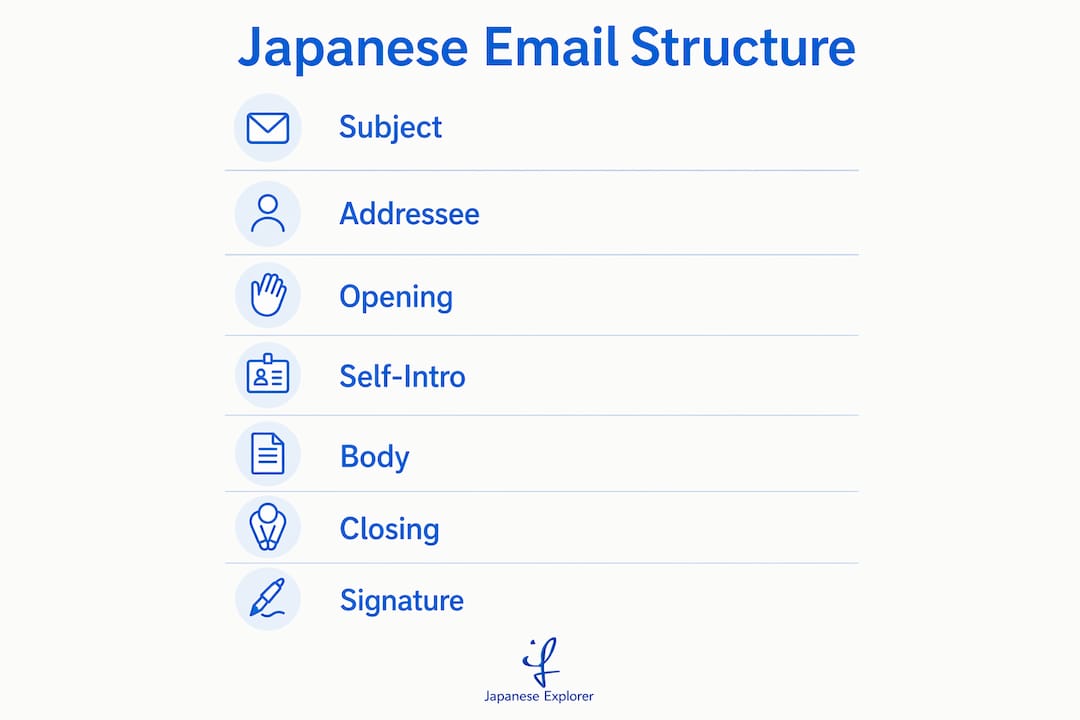
Japanese business email follows a fixed, ritualized structure and polite register. Use that structure correctly, and your recipient can process your message in seconds. Get it wrong, and even a grammatically perfect email can read as rude, careless, or confusing. The single most important rule: lead with your conclusion, not your context, and build every email around these standard parts:
- 件名 (けんめい) — Subject line with a bracketed category tag
- 宛名 (あてな) — Addressee line: company, department, name, and honorific
- 挨拶 (あいさつ) — Opening greeting matched to the relationship
- 自己紹介 (じこしょうかい) — Self-introduction (first contact or external email only)
- 本文 (ほんぶん) — Body: conclusion first, then reason, then detail
- 結び (むすび) — Closing phrase
- 署名 (しょめい) — Signature block
Before you type a single word, make two quick decisions: Is this internal or external? That choice sets your register. And who goes in the TO field versus CC? That determines the recipient order and formality level throughout.
Table of Contents
- 1. What does a complete Japanese business email structure look like?
- 2. How do Japanese subject lines work?
- 3. Honorifics and keigo: what register should you use?
- 4. How do you open a Japanese email and introduce yourself?
- 5. How do you structure the body of a Japanese business email?
- 6. What should your closing and signature block look like?
- 7. Common mistakes, cultural pitfalls, and how to avoid them
- 8. Email vs. chat: when do you keep the ceremony and when do you drop it?
- 9. Copy-paste templates and your pre-send checklist
- Key Takeaways
- Why these rules matter more than most guides admit
- Ready to write Japanese business emails with confidence?
- Useful sources and further reading
- FAQ
1. What does a complete Japanese business email structure look like?
Every part of a Japanese business email has one job. Skipping or reordering them signals inexperience to a Japanese reader immediately. Here is the canonical email structure laid out with what to write in each slot:
| Part | Japanese Term | What to Write |
|---|---|---|
| Subject | 件名 | Bracketed tag + concise topic (e.g., 【日程調整】〇〇会議について) |
| Addressee | 宛名 | Company name + department + 名前+様 (external) or name + title (internal) |
| Opening greeting | 挨拶 | いつもお世話になっております (external) / お疲れ様です (internal) |
| Self-introduction | 自己紹介 | Your company, department, and name — for first contact or external emails |
| Body | 本文 | Conclusion → reason → detail → specific ask with deadline |
| Closing | 結び | よろしくお願いいたします or 何卒よろしくお願い申し上げます |
| Signature | 署名 | Company, department, name, title, phone, email, URL |
Send-before checklist:
- TO field: the person expected to act or reply; CC: colleagues who need awareness, listed by seniority (most senior first)
- Subject line includes a bracketed category tag
- Opening greeting matches the relationship (external vs. internal)
- Self-introduction included if this is a first contact or external email
- Attachments referenced in the body and named clearly
- Line breaks applied every 15–25 full-width characters to avoid a wall of text
2. How do Japanese subject lines work?
The subject line is the first thing a Japanese recipient reads, and it determines whether your email gets opened now or deferred. Japanese business email uses bracketed category markers to let recipients triage their inbox at a glance.
Common tags and their uses:
- 【ご相談】 — for consultation requests
- 【日程調整】 — for scheduling
- 【至急】 — urgent notices
- 【ご確認】 — confirmation requests
- 【ご連絡】 — general notifications
After the tag, add the topic using patterns like 〇〇の件 (regarding 〇〇) or 〇〇についてご連絡 (notification regarding 〇〇). Here are four ready-to-use examples:
- 【日程調整】〇〇会議の日程についてご相談 — Scheduling: Regarding the date of the 〇〇 meeting
- 【ご依頼】〇〇資料のご確認のお願い — Request: Please review the 〇〇 document
- 【至急】〇〇システム障害のご報告 — Urgent: Report on 〇〇 system failure
- 【ご連絡】〇〇プロジェクト進捗のご報告 — Notification: Progress update on 〇〇 project
Pro Tip: Keep the subject short enough to read in the inbox preview without truncation. When scheduling, include the date directly in the subject (e.g., 【日程調整】6月15日〇〇会議について) so the recipient can act without opening the email. For reply chains, clean up accumulated “Re: Re: Re:” prefixes by editing the subject to the current topic.
3. Honorifics and keigo: what register should you use?
Keigo (敬語) is the honorific language system that runs through all Japanese professional communication. You do not need to master every nuance to write a solid business email. What you do need is a reliable baseline and a few key swaps.

The safe baseline: Use polite です/ます forms for all internal communication. For external clients and partners, default to higher-form keigo, specifically humble forms (謙譲語) for your own actions and respectful forms (尊敬語) for the recipient’s actions.
The most practical swap for non-native writers is します → いたします. That single change moves your email from polite to appropriately humble for external use. A few more:
| Plain/Polite | Humble (your actions) | Respectful (their actions) |
|---|---|---|
| 言います | 申します | おっしゃいます |
| 来ます | 参ります | いらっしゃいます |
| もらいます | いただきます | — |
| します | いたします | なさいます |
A quick “keigo sweep” before sending — checking the most important verbs and honorific prefixes — catches the majority of register errors without requiring full keigo mastery. For a deeper look at polite language in business contexts, the rules around ご/お prefixes and verb substitutions are worth studying separately.
4. How do you open a Japanese email and introduce yourself?
The opening line is not optional. It signals your relationship with the recipient before you say anything else. Using the wrong opener is one of the most common mistakes non-native writers make, and Japanese readers notice it immediately.
For first contact (external):
Or the slightly softer version:
For ongoing external relationships:
Note that お世話になっております presupposes a prior relationship. Using it with a true first contact reads as awkward to a native speaker.
For internal emails:
Skip the self-introduction in internal follow-up threads — your name is already visible in the email header, and repeating it reads as overly formal. For external emails, include your company, department, and name in the body opening, then repeat the full details in the signature block.
5. How do you structure the body of a Japanese business email?
The body follows a conclusion-first logic: state what you want or what happened, then give the reason, then add the supporting detail. This is not bluntness — it is considered courtesy for a busy recipient. Experts describe this as a core part of omotenashi in email writing, reducing the cognitive load on the reader.
The structural rule: 結論 (conclusion) → 理由 (reason) → 詳細 (detail) → お願い (ask/deadline)
Worked examples:
| Type | Japanese | English Gloss |
|---|---|---|
| Request | 〇〇資料のご確認をお願いしたく、ご連絡いたしました。[結論] お忙しいところ恐縮ですが、ご確認のほどよろしくお願いいたします。[お願い] | I am writing to request your review of the 〇〇 document. [Conclusion] I apologize for the inconvenience, but could you kindly confirm by June 20? [Ask] |
| Confirmation | ご連絡いただきありがとうございます。〇〇の件、確かに承りました。[結論] 内容を確認の上、改めてご連絡いたします。[詳細] | Thank you for reaching out. I have received your message regarding 〇〇. [Conclusion] I will review the details and follow up shortly. [Detail] |
| Apology | 〇〇の件につきまして、多大なるご迷惑をおかけし、誠に申し訳ございません。[結論] 原因は〇〇であり、現在対応中でございます。[理由] | I sincerely apologize for the significant inconvenience caused regarding 〇〇. [Conclusion] The cause was 〇〇, and we are currently addressing it. [Reason] |
Action template for any request email:
- State the conclusion or purpose in sentence one
- Add one sentence of background or reason
- Specify the exact ask (what you need the recipient to do)
- Include a deadline if there is one
- Add a cushion phrase (クッション言葉) before the ask: 恐縮ですが or お手数をおかけしますが
For formatting, apply hard line breaks every 15–25 full-width characters (or 30–50 half-width characters when mixing ASCII). This keeps the email visually clean and easy to scan on any screen.
6. What should your closing and signature block look like?
The closing phrase (結び) wraps up the email and signals the level of formality you want to leave the recipient with. Choose based on context:
- よろしくお願いいたします — Standard external closing; polite and widely appropriate
- 何卒よろしくお願い申し上げます — Elevated external closing; use for important requests or senior recipients
- お忙しいところ恐縮ですが、よろしくお願いいたします — Acknowledges the recipient’s time; good for requests
- 取り急ぎご連絡まで — Quick stopgap closing; signals you are passing along essentials only
- 以上、よろしくお願いします — Internal closing; concise and appropriate for colleagues
After the closing, the signature block (署名) follows in this order:
- Company name (株式会社〇〇)
- Department name
- Full name
- Job title
- Phone number
- Email address
- Company website URL (optional for internal)
Example external signature:
株式会社〇〇
営業部
田中 花子
営業マネージャー
Tel: 03-XXXX-XXXX
Email: hanako.tanaka@example.co.jp
https://www.example.co.jp
Keep internal signatures shorter — name, department, and phone are usually enough. A full external signature on every internal message reads as unnecessarily formal.
7. Common mistakes, cultural pitfalls, and how to avoid them
Most non-native errors in Japanese business email come from a handful of predictable places. Knowing them in advance saves you from the kind of friction that delays approvals and creates extra back-and-forth.
Top six pitfalls:
- Wrong opener for the relationship: Using いつもお世話になっております internally reads as distant; using お疲れ様です with an external client reads as overly familiar. Match the opener to the channel.
- Over-formality in internal email: Piling on keigo with colleagues can come across as cold or performative. Polite です/ます is enough internally.
- Incorrect CC ordering: List CC recipients by seniority, most senior first. Getting this order wrong is a visible signal that you do not understand workplace hierarchy.
- Missing self-introduction on first contact: Skipping 初めてご連絡いたします and your affiliation leaves the recipient guessing who you are.
- No line breaks: A wall of unbroken Japanese text is hard to read on any device. Apply manual line breaks every 15–25 full-width characters.
- Reply-all on sensitive threads: CC everyone who needs awareness, but do not reply-all when only one person needs your response.
The cultural logic behind these rules comes from two concepts. Omotenashi (おもてなし) means reducing the recipient’s effort — structure, line breaks, and conclusion-first logic all serve this. Meiwaku (迷惑) means avoiding causing trouble — unnecessary CCs, vague subjects, and missing attachments all create it. For a fuller look at common language mistakes that carry over into writing, those patterns are worth reviewing.
Pro Tip: If you send an email with the wrong opening (e.g., used the external opener internally), a short correction works fine: 先ほどのメールにて失礼いたしました。正しくは〇〇でございます。 — “I apologize for the error in my previous email. The correct [information] is 〇〇.” Send it promptly and move on.
8. Email vs. chat: when do you keep the ceremony and when do you drop it?
Channel matters as much as content. The rituals that make an email professional can make a Slack message feel robotic.
Clear channel rules:
- External email (first contact or ongoing): Full ceremony — opener, self-introduction, conclusion-first body, formal closing, full signature
- External email (reply in an active thread): Keep the opener (お世話になっております) but shorten the body; skip re-introduction after the first exchange
- Internal email: Polite forms (です/ます), short opener (お疲れ様です), no self-introduction, shorter signature
- Internal chat (Slack, Teams DM): Drop the repeated opener after the first message in a thread; use concise polite forms; no closing phrase needed
- Phone follow-up: Use when an email has gone unanswered for longer than expected; a short apology email afterward (取り急ぎご連絡まで) confirms the call
Response time expectations: Acknowledge emails within the same business day, even if you cannot fully address the content yet. A brief 確かに受け取りました (I have received this) buys you time without leaving the sender waiting. For meeting-related follow-ups, the same day acknowledgment norm applies.
9. Copy-paste templates and your pre-send checklist
These five templates cover the most common business email scenarios. Each includes a Japanese version and an English gloss. Adapt the bracketed placeholders to your situation.
Scheduling request:
件名:【日程調整】〇〇会議の日程についてご相談
〇〇株式会社 〇〇部 〇〇様
いつもお世話になっております。〇〇株式会社の〔名前〕でございます。
〇〇会議の日程につきまして、ご相談させていただきたく存じます。
下記の日程でご都合はいかがでしょうか。
・6月15日(月)14:00〜15:00
・6月17日(水)10:00〜11:00
お忙しいところ恐縮ですが、ご確認のほどよろしくお願いいたします。
〔署名〕
Subject: [Scheduling] Regarding the date of the 〇〇 meeting. I am writing to discuss the schedule for the 〇〇 meeting. Would either of the following times work for you? [dates listed] I apologize for the inconvenience and appreciate your confirmation.
Short follow-up:
件名:【ご確認】〇〇の件、その後いかがでしょうか
お世話になっております。先日ご送付いたしました〇〇の件につきまして、ご確認状況をお伺いできますでしょうか。取り急ぎご連絡まで。
Subject: [Confirmation] Following up on 〇〇. I am writing to check on the status of the 〇〇 I sent previously.
Apology/incident (initial report):
件名:【至急】〇〇システム障害のご報告
〇〇様、お世話になっております。〇〇の件につきまして、多大なるご迷惑をおかけし、誠に申し訳ございません。現在、原因を調査中でございます。詳細が判明次第、改めてご報告いたします。
Subject: [Urgent] Report on 〇〇 system failure. I sincerely apologize for the significant inconvenience. We are currently investigating the cause and will report back as soon as details are confirmed.
For incident reporting workflows in corporate settings, the standard practice is to send an immediate brief report first, then a follow-up with root cause and countermeasures once available.
Pre-send checklist:
- TO/CC: Action recipient in TO; awareness recipients in CC, ordered by seniority
- Subject tag: Bracketed category marker included and topic is clear
- Opener: Matches the relationship (external vs. internal)
- Self-introduction: Included for first contact or external emails
- Line breaks: Applied every 15–25 full-width characters
- Attachments: Referenced in the body by name; filename is clear and professional (no “final_FINAL_v3”)
Using copy-paste templates as a starting point reduces correction cycles significantly, especially for non-native writers navigating keigo for the first time.
Key Takeaways
A correct Japanese business email uses a fixed seven-part structure, leads the body with the conclusion, and matches the opening greeting precisely to the relationship type.
| Point | Details |
|---|---|
| Use the seven-part structure | Every email needs subject, addressee, opener, self-intro (if external), body, closing, and signature in that order. |
| Lead with your conclusion | State what you want or what happened in sentence one; add reason and detail after. |
| Match opener to relationship | Use いつもお世話になっております externally and お疲れ様です internally — swapping them is a visible error. |
| Apply line breaks | Break every 15–25 full-width characters to keep the email readable on any screen. |
| Japanese Explorer for practice | Japanese Explorer’s Business Japanese course covers keigo, email templates, and workplace phrasing with native-speaker feedback. |
Why these rules matter more than most guides admit
Most articles on Japanese email etiquette treat the structure as a checklist you tick off and move on. The reality is more interesting than that. The rituals are not bureaucratic filler — they are a communication system designed to reduce friction for the recipient at every step. The bracketed subject tag tells the reader what kind of response is needed before they open the email. The conclusion-first body means a busy executive can read one sentence and know whether to act now or delegate. The CC order by seniority is a live signal of whether you understand the room.
What trips up non-native writers most often is not the grammar — it is the register mismatch. Using the external opener internally, or the internal opener with a client, does not just sound odd. It communicates something specific: that you do not know the relationship well enough to calibrate your language. In a culture where reading the situation (空気を読む) is a core professional skill, that mismatch carries weight.
The most underrated piece of advice for anyone writing Japanese business email regularly: do a keigo sweep on your verbs before you send. You do not need to have mastered the full honorific system. You need to catch the three or four verbs that carry the most social weight in your message and make sure they are in the right form. That single habit closes most of the gap between a passable email and a professional one.
Ready to write Japanese business emails with confidence?
If you want to move from templates to genuine fluency, structured practice with native-speaker feedback makes the difference; consider organized study trips to Destination Japan for immersive learning experiences. Japanese Explorer’s Business Japanese course is built for exactly this: keigo drills, real email templates, and workplace scenarios taught by certified bilingual instructors. Whether you prefer small-group classes in Singapore or online sessions via Zoom, the curriculum covers the email structures, phrase patterns, and cultural context you have read about here — with the kind of live correction that no template can replace.
View the Business Japanese course details and book your first session at Japanese Explorer’s training center at 10 Anson Road, Level 22, International Plaza, Singapore 079903, right above Tanjong Pagar MRT.
Useful sources and further reading
- Real-World Japanese: How to Write a Japanese Business Email — Covers structure, line-break rules, TO/CC etiquette, and formatting conventions in detail.
- Real-World Japanese: Japanese Email Phrases — A phrase library organized by context and politeness level, from openings to closings.
- Real-World Japanese: Business Email Templates — Ready-to-use templates with subject lines, openers, and signature block examples.
- Japan Living Life: Japanese Business Email Etiquette Guide — Practical guide covering the 7-part format, keigo, meeting protocols, and addressing conventions for foreigners working in Japan.
- J-Compass: Keigo Business Writing Guide — Deep-dive into the keigo categories behind email phrases, with 文化庁 classification and verb tables.
- Japanese Explorer: Workflow for Japanese Email Writing — Step-by-step workflow with omotenashi and meiwaku framing for learners building their email practice.
FAQ
What is the standard structure of a Japanese business email?
A Japanese business email follows a seven-part structure: subject line (件名), addressee (宛名), opening greeting (挨拶), self-introduction (自己紹介), body (本文), closing (結び), and signature (署名). The body leads with the conclusion, followed by reason and detail.
Which opening phrase should you use in a Japanese business email?
Use いつもお世話になっております for external contacts with an existing relationship, and 初めてご連絡いたします for true first contact. Internally, お疲れ様です is the standard opener.
How formal does your Japanese need to be in a business email?
At minimum, write in polite です/ます forms throughout. For external clients and senior recipients, use humble forms (謙譲語) for your own actions — the simplest upgrade is switching します to いたします.
How quickly should you respond to a Japanese business email?
Acknowledge emails within the same business day, even if you cannot fully address the content. A brief 確かに受け取りました (I have received this) is enough to signal responsiveness while you prepare a complete reply.
Do you need to re-introduce yourself in every email?
Only on first contact or when emailing an external party who may not know you. In ongoing threads or internal emails, skip the self-introduction — your name appears in the email header, and repeating it in the body reads as unnecessarily formal.